반응형
1. 개요
- 앞선 일곱번째 포스팅에서 아래와 같이 글로벌 예외처리를 하였다.
- https://arckwon.tistory.com/entry/nestjs-typeorm-backend-%EC%98%88%EC%99%B8%EC%B2%98%EB%A6%AC-7
nestjs + typeorm backend 예외처리 (7)
1. 개요 앞선 여번째 포스팅에서 아래와 같이 Middleware를 활용한 로그설정을 하였다. https://arckwon.tistory.com/entry/nestjs-typeorm-backend-Middleware-%EB%A1%9C%EA%B7%B8%EC%84%A4%EC%A0%95-6 이번포스팅에서는 Exception fil
arckwon.tistory.com
- 이번 포스팅에서는 csrf처리를 해본다.
- 특히 GS인증같은 경우 csrf는 필수적으로 처리해야한다. securiey token을 사용하는 방법과 referer를 통한 방법이있다.
- 해당포스팅에서는 CSRF Protection 처리를 해보겠다.
- https://docs.nestjs.com/security/csrf
Documentation | NestJS - A progressive Node.js framework
Nest is a framework for building efficient, scalable Node.js server-side applications. It uses progressive JavaScript, is built with TypeScript and combines elements of OOP (Object Oriented Programming), FP (Functional Programming), and FRP (Functional Rea
docs.nestjs.com

2. 프로세스
- nestjs백엔드 에서 csruf를 설치한다.
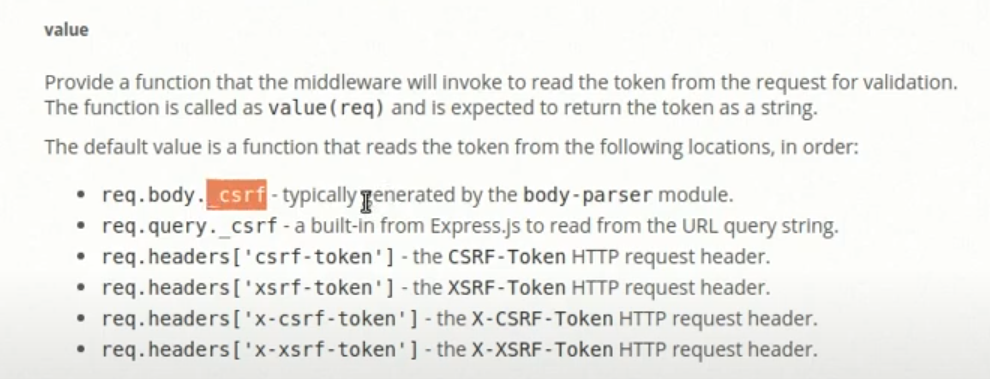
- cookieParser를 사용하여 토큰을 생성한다. 토큰기본키는 _csrf 이다.
- 클라이언트에서 쿠키로 _csrf 토큰을 취득한다.
- 이후 body 또는 parameter 또는 header에 실어서 보내야한다.
- 중요한것은 보낼때 name이 각각 틀리니 주의한다.
- 여기서는 csrf토큰을 header에 담에서 전송하기 때문에 name을 csrf-token 으로 보내야한다.
3. 개발소스
- csurf 설치
# 패키지 설치

npm install --save cookie-parser
npm install --save csurf
- app.module.ts

app.mobules.ts

import {
  Module,
  NestModule,
  RequestMethod,
  MiddlewareConsumer,
} from '@nestjs/common';
import { ConfigModule } from '@nestjs/config';
import { TypeOrmModule } from '@nestjs/typeorm';
import { typeOrmConfigAsync } from './config/database/typeorm.config';
import { UserModule } from './user/user.module';

import { LoggerMiddleware } from './common/middleware/logger.middleware';

import configuration from './config/profile/profile.config';
import * as csurf from 'csurf';
import * as cookieParser from 'cookie-parser';

@Module({
  imports: [
    ConfigModule.forRoot({ load: [configuration] }),
    TypeOrmModule.forRootAsync(typeOrmConfigAsync),
    UserModule,
  ],
})
export class AppModule implements NestModule {
  configure(consumer: MiddlewareConsumer) {
    consumer
      .apply(LoggerMiddleware)
      .exclude({ path: 'test', method: RequestMethod.GET }, 'test/(.*)')
      .forRoutes({ path: '/**', method: RequestMethod.ALL });
    consumer
      .apply(
        cookieParser(),
        csurf({
          cookie: {
            key: '_csrf',
            path: '/',
            httpOnly: false,
            secure: false,
            signed: false,
            sameSite: 'strict',
            maxAge: 24 * 60 * 60 * 1000, // 24 hours
          },
        }),
      )
      .forRoutes(
        { path: '/**', method: RequestMethod.POST },
        { path: '/**', method: RequestMethod.PUT },
        { path: '/**', method: RequestMethod.PATCH },
        { path: '/**', method: RequestMethod.DELETE },
        { path: '/**', method: RequestMethod.GET },
      );
  }
}
4. 테스트
- POSTMAN을 활용하여 token을 발행한다.
- 아래는 테스트용 샘플

- 토큰확인

- 토큰을 헤더어 실어서 POST 방식으로 전송
- 헤더네임을 헤더에 보낼때는 csrf-token

※. 기타방식
- xsrf토큰을 사용하는 방식도 존재한다.
- main.ts에 적용한다.
// main.ts

import * as cookieParser from 'cookie-parser';
import * as csurf from 'csurf';

app.use(cookieParser());
app.use(csurf({ cookie: true }));

app.use((req: any, res: any, next: any) => {
	const token = req.csrfToken();
	res.cookie('XSRF-TOKEN', token);
	res.locals.csrfToken = token;
	next();
});
반응형
'개발 > nest.js' 카테고리의 다른 글
| nestjs + typeorm backend 회원가입 / 소스포함 (10) (0) | 2023.03.29 |
|---|---|
| nestjs + typeorm backend helmet사용 (9) (0) | 2023.03.28 |
| nestjs + typeorm backend 예외처리 (7) (0) | 2023.03.24 |
| nestjs + typeorm backend 인터셉터,CORS (5) (0) | 2023.03.23 |
| nestjs + typeorm backend 서버 만들기 CRUD (4) (0) | 2023.03.20 |


